Learning to play the guitar is a thrilling journey that opens up a world of musical possibilities. One of the first and most essential skills every guitarist must master is understanding chord diagrams. These visual representations help you learn finger placement on the fretboard, enabling you to play chords accurately and confidently. In this article, we will explore how to read chord gitar diagrams effectively, ensuring that you build a solid foundation for your guitar-playing skills.
What is a Guitar Chord Diagram?
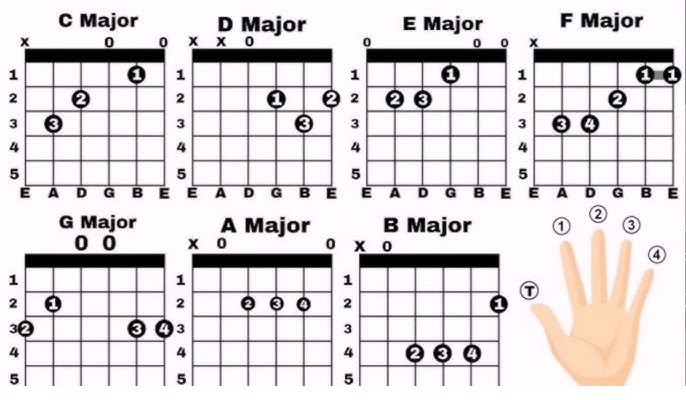
A chord gitar diagram is a visual chart that represents the neck of the guitar and shows you where to place your fingers to play a specific chord. It is like looking at the guitar neck vertically, with the headstock at the top and the body at the bottom.
Basic Components of a Chord Diagram
Before diving into how to read the diagram, it’s important to understand its components:
-
Vertical lines: These represent the guitar strings. From left to right, they are the low E, A, D, G, B, and high E strings.
-
Horizontal lines: These represent the frets. The top horizontal line typically represents the nut (top of the fretboard), and the lines below represent the subsequent frets.
-
Dots or circles: These show where to press down with your fingers.
-
Numbers (on dots or below the diagram): Indicate which finger to use (1 for index, 2 for middle, etc.).
-
X and O symbols above the diagram: An “X” means the string is not played (muted), and an “O” means the string is played open (not pressed).
How to Read a Chord Diagram Step-by-Step
Understanding how to read a chord diagram becomes simple once you break it down into logical steps.
Step 1: Position the Diagram Correctly
Imagine holding the guitar upright in front of you. The diagram should be viewed vertically, as if you’re looking at the front of the guitar neck. The strings are shown from left (low E) to right (high E).
Step 2: Read from Top to Bottom
Start at the top of the diagram:
-
The top thick line usually represents the nut of the guitar.
-
The horizontal lines below represent the frets — the spaces between the metal bars on your guitar neck.
If the diagram starts from a fret higher up the neck (like 5th or 7th), the fret number will be indicated to the side.
Step 3: Identify Which Strings to Play
Look at the top of the diagram:
-
An “O” means play that string open.
-
An “X” means do not play that string.
-
No symbol often means you play that string, but press it on a fret.
Step 4: Finger Placement
Look for black or colored dots on the diagram:
-
Each dot indicates where you should press your finger.
-
Numbers inside or below the diagram (1–4) show which finger to use:
-
1 = Index
-
2 = Middle
-
3 = Ring
-
4 = Pinky
-
For example, in an open C major chord:
-
Your index finger (1) goes on the 1st fret of the B string.
-
Your middle finger (2) goes on the 2nd fret of the D string.
-
Your ring finger (3) goes on the 3rd fret of the A string.
Tips for Reading and Memorizing Chords
Practice Common Chord Shapes
Start by learning easy and essential chords like C, G, D, E, A, Am, Dm, and Em. These are the foundation of most songs and give you plenty of practice interpreting diagrams.
Use Repetition
The more you read and practice using diagrams, the faster your brain will associate the visual diagram with actual finger movements. Repetition builds muscle memory.
Use a Mirror or Video
Practice in front of a mirror or record yourself playing. This can help you see if you’re placing your fingers correctly as indicated in the diagram.
Listen While You Play
Train your ear to recognize how a correct chord should sound. If it sounds muted or buzzy, revisit the diagram and check finger positions.
Common Challenges and How to Overcome Them
Problem: Fingers Don’t Reach Properly
Solution: Double-check the diagram and try to relax your hand. Make sure you’re pressing with the tips of your fingers and not flattening them.
Problem: Chord Sounds Muted
Solution: Ensure your fingers are not touching adjacent strings that should ring out. Check the diagram to confirm you’re pressing the correct frets.
Problem: Diagrams Seem Confusing
Solution: Focus on one chord at a time. Practice reading and forming it slowly. Use colored markers or apps that animate finger positions.
Using Online Tools and Apps
Modern tools like GuitarTuna, Ultimate Guitar, or ChordBank provide interactive diagrams and real-time feedback. These are great for beginners and can speed up the learning process.
Final Thoughts
Learning how to read chord gitar diagrams effectively is a key skill for every guitarist. By understanding the structure of a chord diagram and practicing regularly, you can master even complex chord shapes with confidence. Remember, start simple, be patient, and use diagrams as a daily tool in your musical journey. Whether you’re strumming for fun or preparing for performances, chord diagrams will always be your reliable guide to the world of guitar music.